Ready to take your lower body workouts up a notch? The hip thrust exercise has become the gold standard for building serious glute strength and size.
This movement lets you load up with heavy weights while really zoning in on your glutes—more than almost any other exercise. Hip thrusts mainly fire up your gluteus maximus, the biggest muscle in your butt, which powers moves like sprinting, jumping, and heavy lifting.
When you strengthen your glutes with hip thrusts, you’re not just working on looks. You’re also building functional power that helps with athletic performance, posture, and even keeping lower back pain at bay.
The barbell hip thrust lets you use progressive overload easily, so it’s perfect if you want to see real progress.
Whether you’re an athlete chasing speed, a lifter boosting your squat and deadlift, or just someone wanting to move better every day, hip thrusts should be in your rotation. There are tons of variations—bodyweight, barbell, single-leg—so you can tweak them for any fitness level or goal.
Key Takeaways
- Hip thrusts target your glutes more directly than most moves, so they’re a must for both looks and performance.
- Good form keeps the focus on your glutes and takes pressure off your lower back.
- Mix up your hip thrust variations and bump up the resistance over time to keep building strength.
What Are Hip Thrust Exercises?
Hip thrusts are all about targeting your glutes through controlled hip extension with your upper back propped on a bench. They’ve turned into a go-to move for lower-body training because they really isolate and build up the glute muscles.
Understanding the Hip Thrust Movement
The hip thrust is a serious glute builder that has you drive your hips upward against resistance. You’ll set your upper back on a bench, feet flat, knees bent, and a weight (usually a barbell) across your hips.
This move focuses on hip extension—basically, straightening your hip joint by squeezing your glutes. Unlike squats or deadlifts, hip thrusts don’t spread the work across as many different muscles.
They mainly hit your gluteus maximus, but your hamstrings and core chip in too. What’s cool is that you get max tension on your glutes at the top when they’re really contracted.
You can do hip thrusts with all sorts of gear:
- Barbell
- Dumbbell
- Resistance bands
- Smith machine
- Or just your bodyweight if you’re new to it
History of Hip Thrusts
Bret Contreras, aka “The Glute Guy”, really put hip thrusts on the map. Sure, people did hip extension exercises before, but Contreras made the barbell hip thrust a thing around 2006 and dove deep into its benefits.
Before that, glute training was mostly squats and lunges. Contreras’s EMG studies showed hip thrusts light up the glutes more than those classics.
The move caught fire in fitness circles as athletes and trainers noticed the performance perks. Sports scientists started adding hip thrusts to programs after seeing boosts in sprint speed and power.
Now, hip thrusts are the gold standard for glute strength and size. You’ll find them in strength routines, rehab plans, and training for looks.
Popular posts:
Anatomy of the Glutes and Related Muscles
Knowing which muscles you’re working helps you train smarter. Your glutes and supporting muscles team up for strong hip extension and stability.
Gluteus Maximus and Its Role
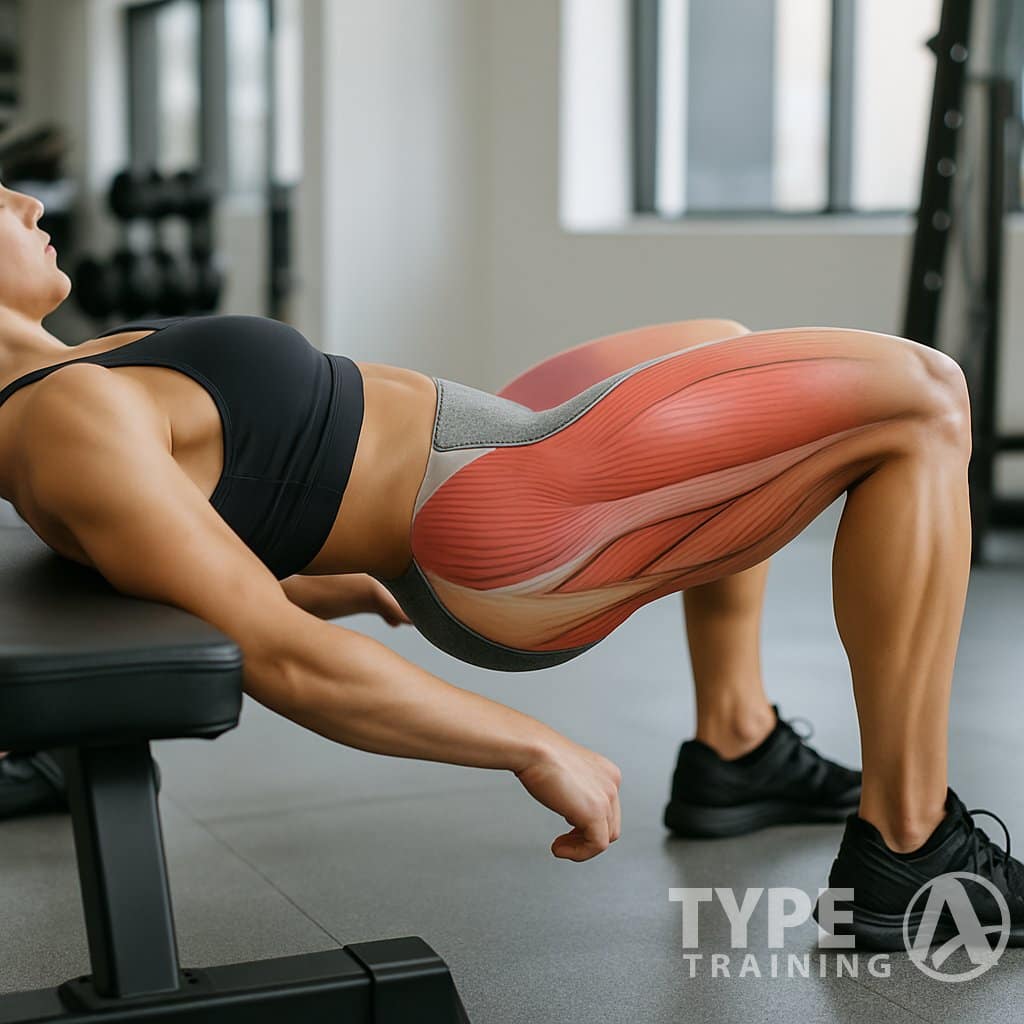
The gluteus maximus is the biggest, most powerful muscle in your butt. It covers most of the area and drives hip extension.
When you thrust your hips up, the glute max does the heavy lifting. It’s key for explosive stuff—sprinting, jumping, climbing stairs, you name it.
This muscle connects your pelvis and sacrum to your femur. Its main job is extending your hip, but it also helps turn your leg out to the side.
Strong glute max muscles support good posture and keep your pelvis aligned. They also help take pressure off your lower back during lifting and everyday stuff.
Gluteus Medius, Minimus, and Synergists
Your gluteus medius and minimus are smaller, but don’t ignore them. They sit on the outer pelvis and handle hip abduction (moving your leg out) and internal rotation.
The glute medius keeps your pelvis steady during single-leg moves. If it’s weak, other muscles have to pick up the slack, which can mess with your knees and back.
Other muscles that help out:
- Adductors: Inner thighs that stabilize you
- Core: Keeps your trunk steady
- Hip flexors: Work against your glutes as you extend your hips
These muscles balance out your hip joint and keep your movement patterns healthy.
Posterior Chain Activation
The posterior chain is just the line of muscles running down the back of your body. In hip thrusts, your hamstrings (biceps femoris, semitendinosus, semimembranosus) team up with your glutes to extend your hips.
Your hamstrings run from your sit bones down past your knee. They help with both hip extension and knee flexion, so they’re important for hip thrusts, deadlifts, and running.
When you train your posterior chain right, you boost your power and lower your injury risk. It’s a win-win for athletes and weekend warriors alike.
Your quads also kick in to stabilize your knees during hip thrusts. This leads to more balanced strength around your lower body joints.
To really target your posterior chain, you need moves that work both your glutes and hamstrings through their full range.
Benefits of Hip Thrust Exercises
Hip thrusts are kind of a cheat code for your lower body—they target the right muscles for better function and athleticism. They’re one of the best ways to build strong glutes and help you move and stand better, too.
Building Stronger Glutes
Nothing beats hip thrusts for glute activation. Studies show they fire up your gluteus maximus better than old-school moves like squats.
So, why should you care? Strong glutes:
- Keep your hips working right
- Help prevent lower back pain
- Make daily stuff like stairs easier
- Look good, let’s be honest
The hip extension in hip thrusts challenges your glutes through a full range, giving them the kind of tension that actually builds muscle. Other exercises just don’t hit that spot as well.
If you stick with it and add weight over time, you’ll see your lower body strength jump in a matter of weeks.
Enhancing Athletic Performance and Stride
Hip thrusts do wonders for your power and speed. Some studies even show athletes who do hip thrusts twice a week for seven weeks get faster and more explosive than those who only focus on squats.
If you’re a runner or sprinter, stronger glutes mean better hip extension—and that’s what drives you forward. Hip thrusts train that exact movement, leading to:
- Quicker 10-meter sprints
- More explosive jumps
- Smoother, more efficient strides
- Faster acceleration
Bottom line: Hip thrusts build the kind of force you need for almost any sport, from basketball to soccer. That’s not hype—it’s just how the body works.
Improving Posture and Stability
Hip thrusts build up the muscles that help keep your pelvis in the right place. That directly helps your posture and makes you more stable overall.
Strong glutes fight off anterior pelvic tilt—a posture issue that can leave you with a sore lower back and odd movement patterns. Your core and hip stability get a boost too, since these muscles have to work together during hip thrusts.
This sets you up for:
- Better balance during daily activities
- Reduced risk of lower back injuries
- Improved standing and sitting posture
- Enhanced pelvic stability during movement
The benefits go way beyond the gym. Even just standing, walking, or climbing stairs feels easier when your glutes and hips work like they should.
Plenty of people notice their back pain fades once they start doing hip thrusts. The exercise shifts the workload from tired back muscles to the glutes, which are supposed to handle it anyway.
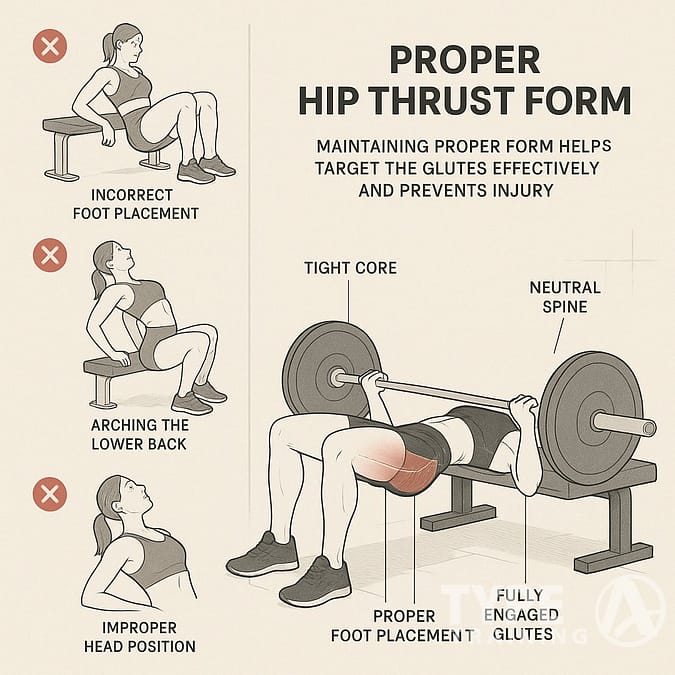
Hip Thrust Techniques and Proper Form
Getting your hip thrust form right really matters. It’s the best way to fire up your glutes and steer clear of injuries.
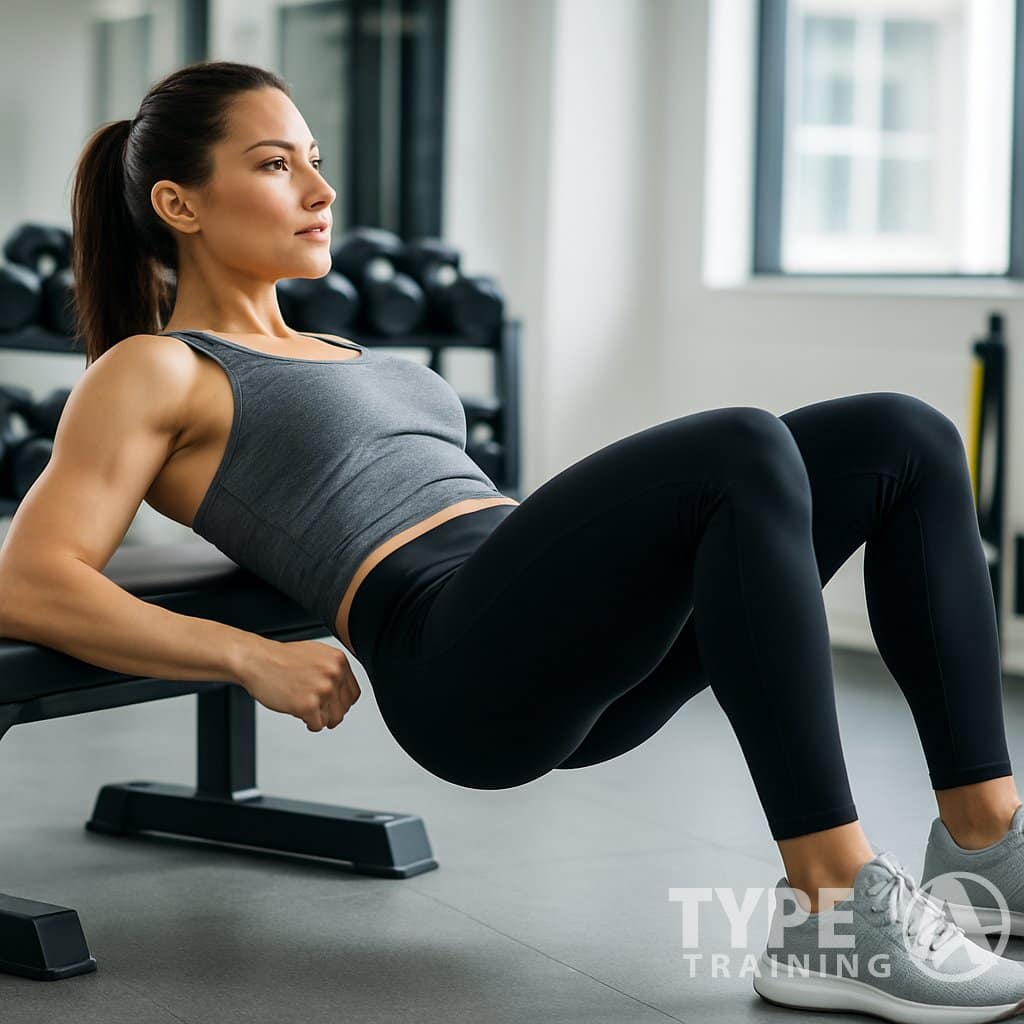
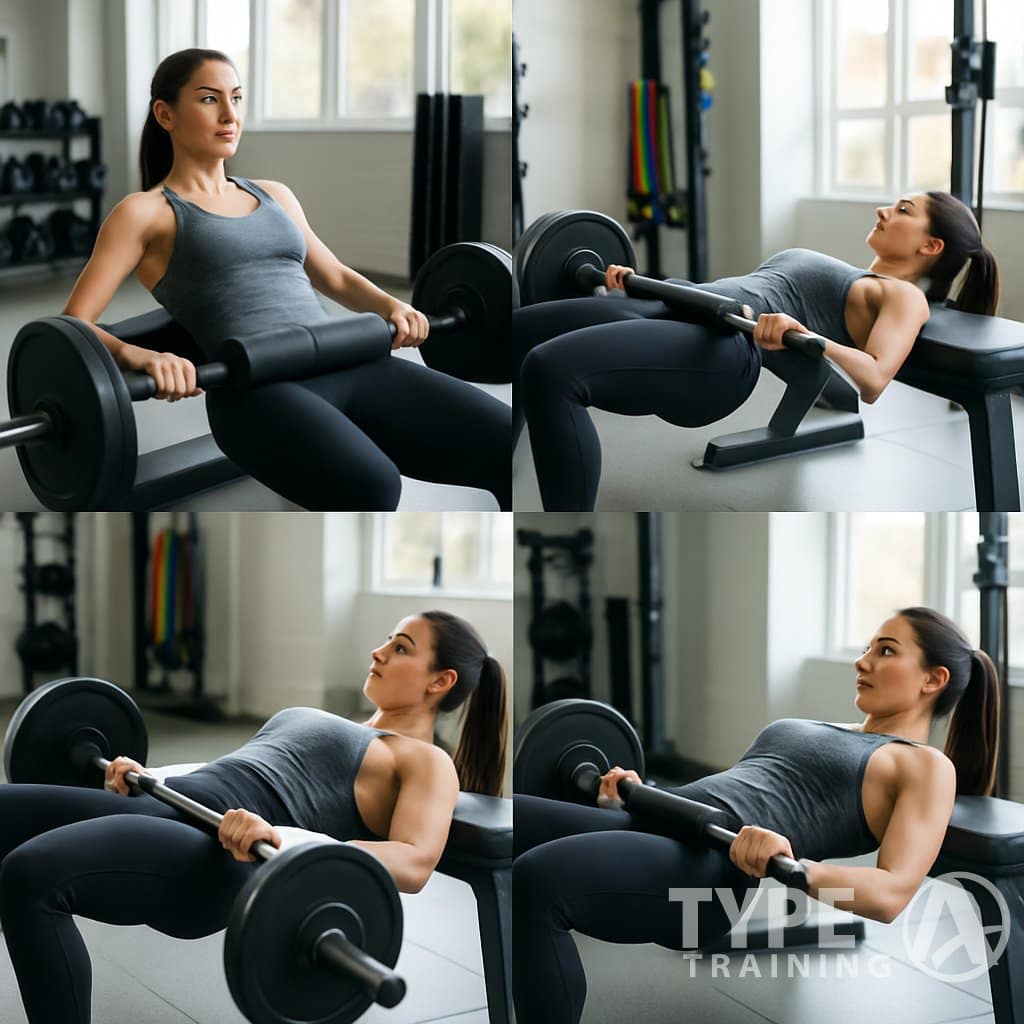
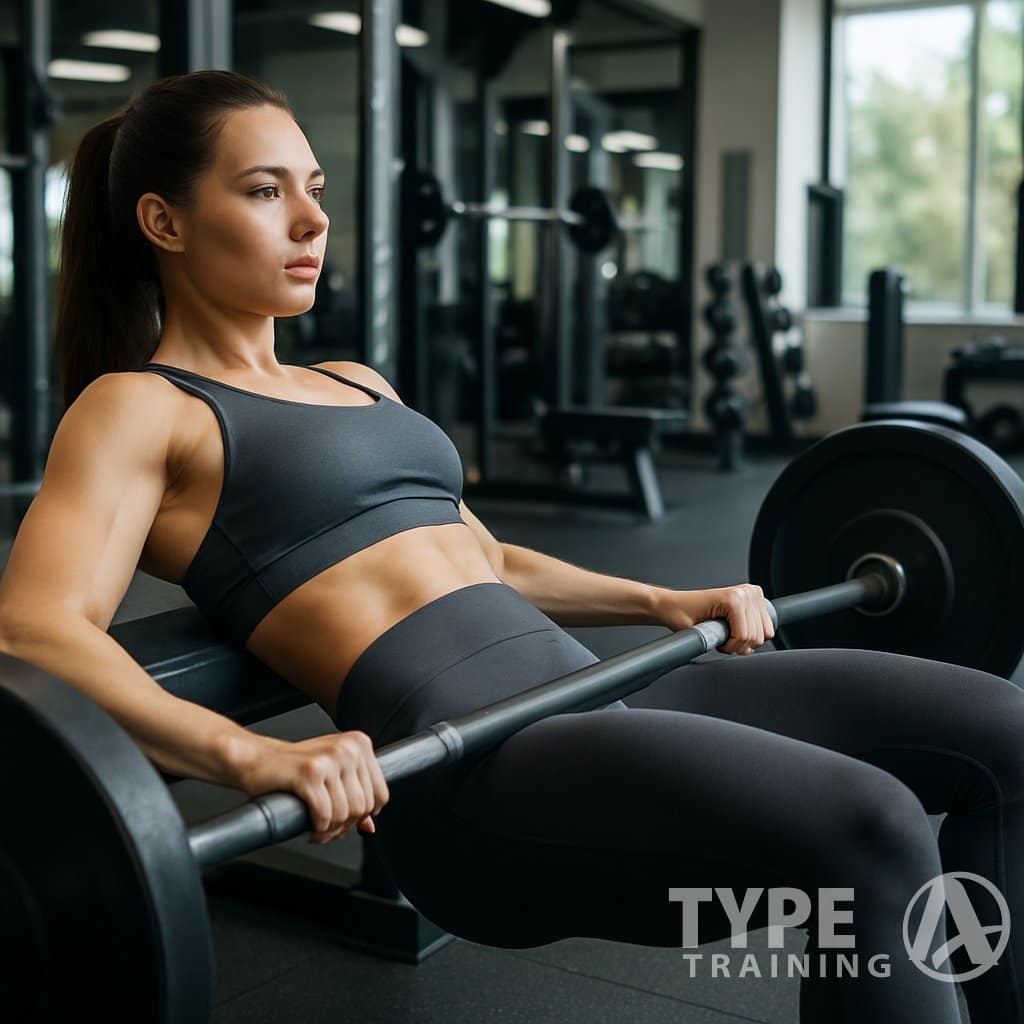
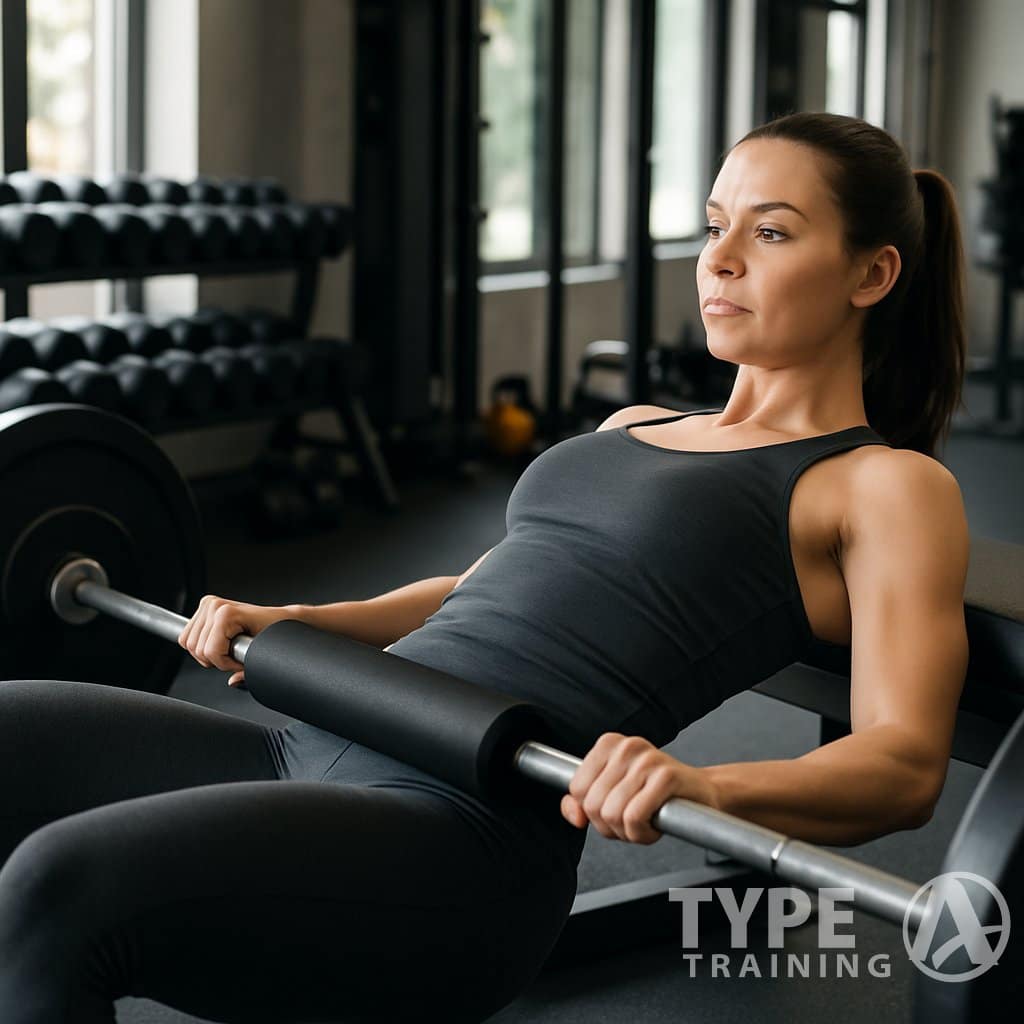
How to Do Hip Thrusts Correctly
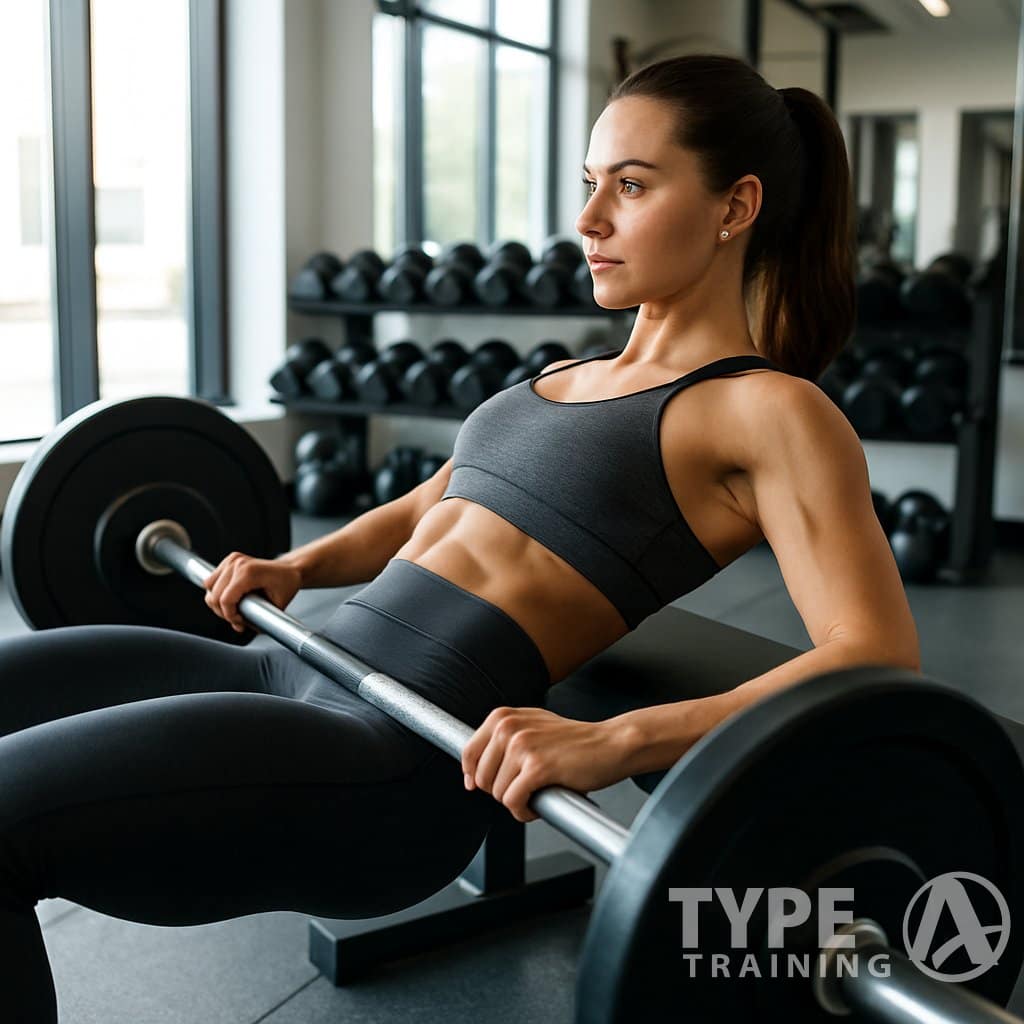
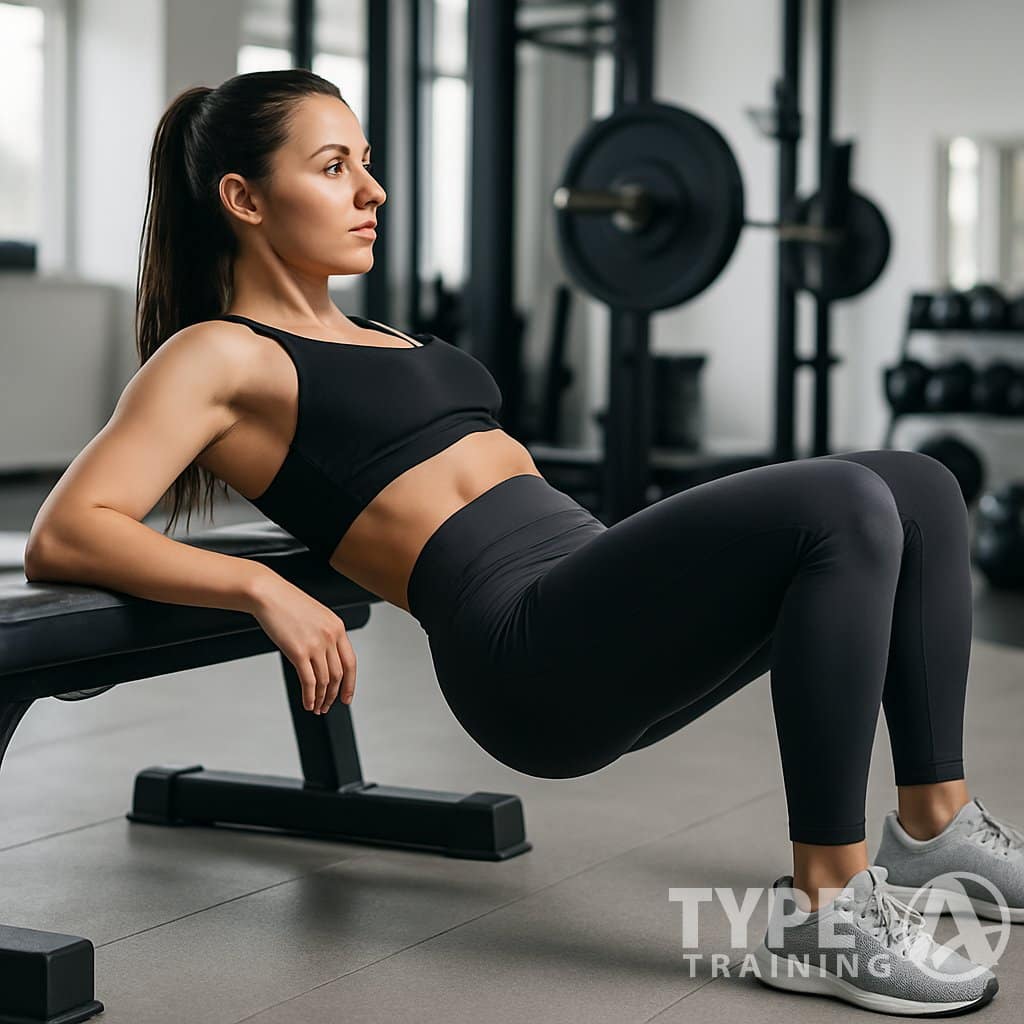
Sit on the floor with your upper back resting on a bench. Lay a barbell across your hips—a pad helps a lot with comfort.
Feet go flat on the ground, about shoulder-width apart. Bend your knees so you get a 90-degree angle, and make sure your shins are vertical at the top.
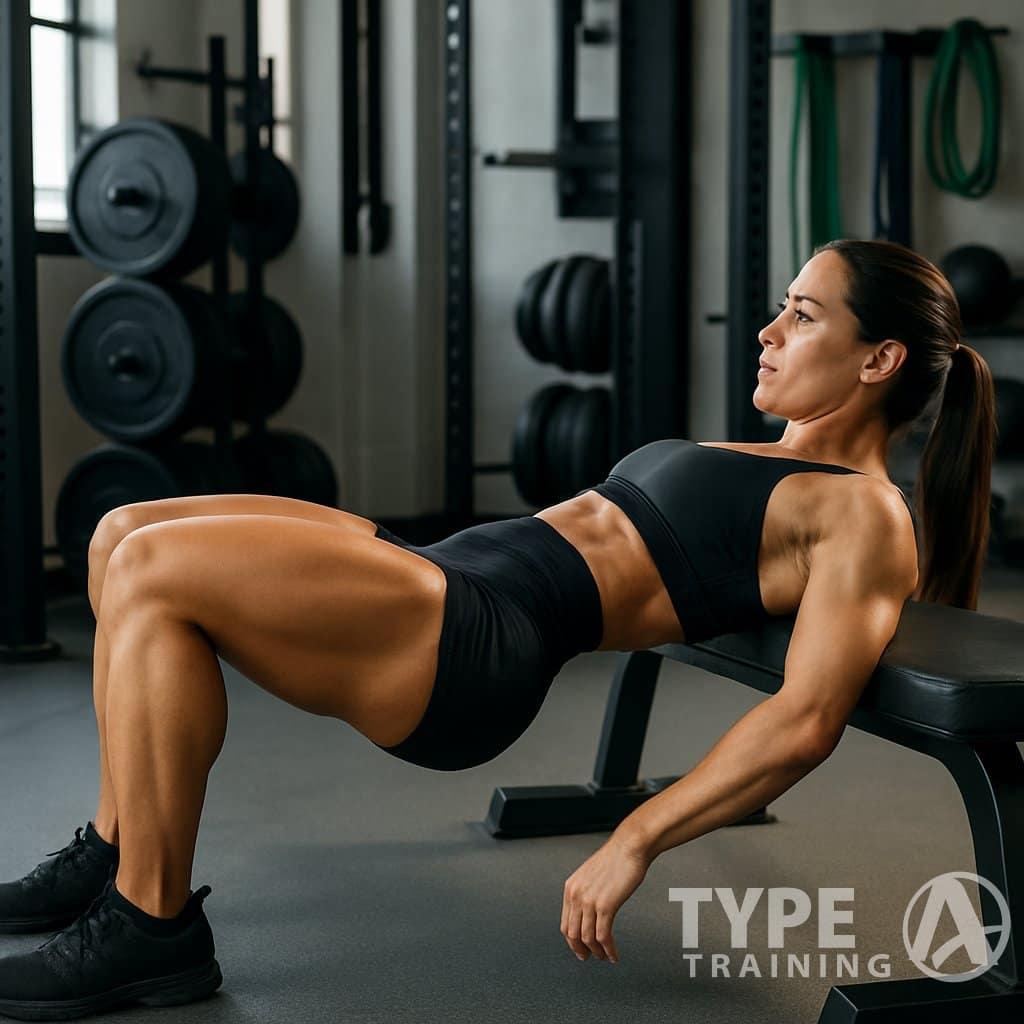
Push through your heels and lift your hips up until your body’s in a straight line from shoulders to knees. Squeeze your glutes at the top—don’t skip that part.
Keep your chin tucked just a bit to keep your spine neutral. Research says hip thrusts are awesome for glute growth, maybe even better than squats or deadlifts.
Lower your hips back down with control. Try for 3-4 sets of 8-12 reps.
Tips for Proper Posture and Alignment
Engage your core the whole time. Brace your abs so your lower back stays protected and your form holds up.
Don’t let your back arch at the top. You want a straight line from shoulders to knees, not a big curve. That way your spine stays happy.
Push through your heels, not your toes. This fires up your glutes more and keeps your knees out of trouble.
Keep your knees in line with your toes. Don’t let them cave in or flare out.
If you’re new to hip thrusts, nail the bodyweight version first. Once you feel solid, slowly add weight to keep making progress.
Muscles Worked During Hip Thrusts
Hip thrusts hit a bunch of muscles in your backside. They’re easily one of the best moves for building lower body strength.
Knowing which muscles you’re working can help you get more out of every rep.
Primary Movers: Glutes and Hamstrings
The gluteus maximus is the main driver here. This big muscle in your butt works harder in hip thrusts than in squats or deadlifts, so it’s fantastic for glute growth.
Your hamstrings back up the glutes. They help extend your hips and keep things stable. The adductor magnus (the hamstring part) jumps in too.
You’ll feel the most at the very top, when your hips are fully extended and you’re in that straight line.
Supporting Muscles and Synergists
Your lower back muscles (erector spinae) help keep your spine in check. They stop your back from arching too much, which is key for staying safe.
The core muscles tighten up to keep your trunk steady. A braced core lets you transfer force through your body.
Other helpers:
- Gluteus medius and minimus: Stabilize your hips
- Adductors: Get your inner thighs involved
- Quadriceps: Lend a little support at the knees
For the best glute activation, really squeeze your glutes at the top. That mind-muscle link makes a difference and keeps you on target.
Popular Hip Thrust Variations
You can do hip thrusts a bunch of different ways. These tweaks help you go from beginner to advanced and challenge your glutes in new ways.
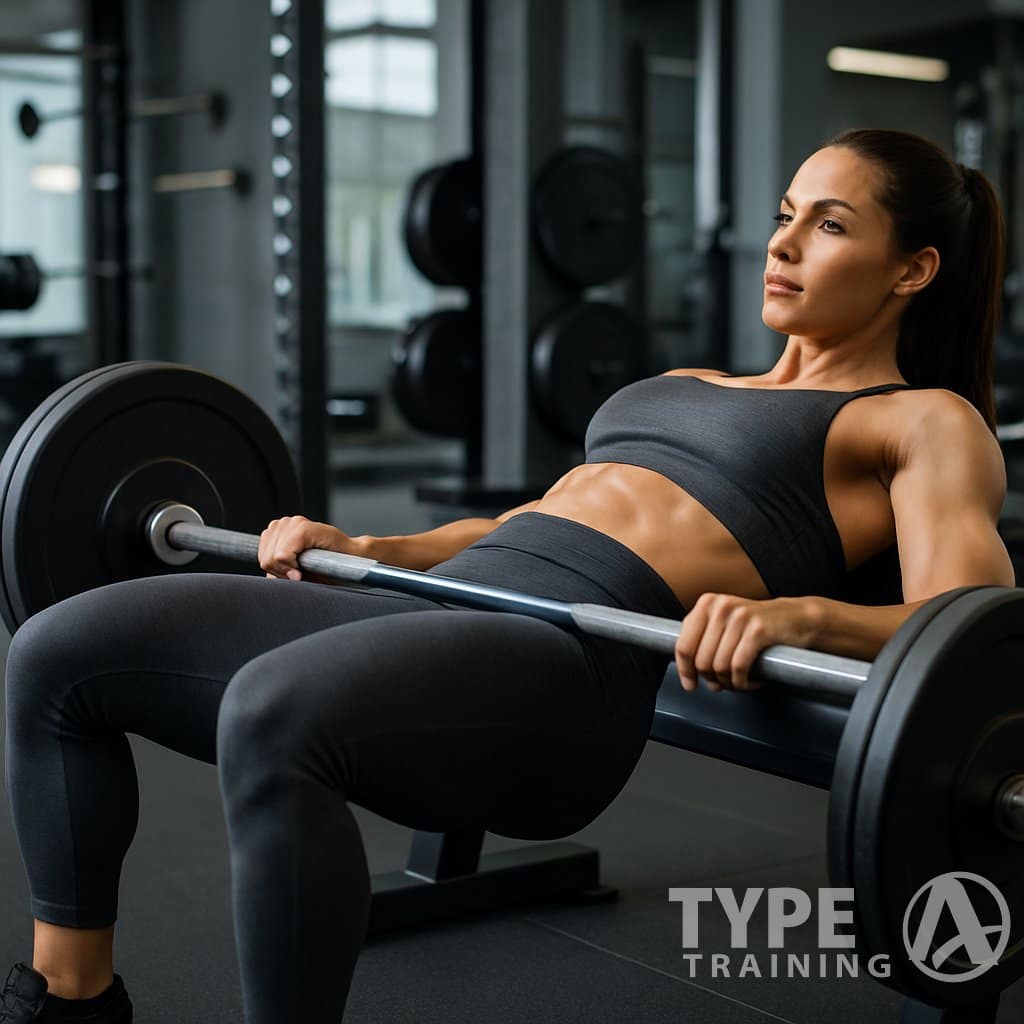
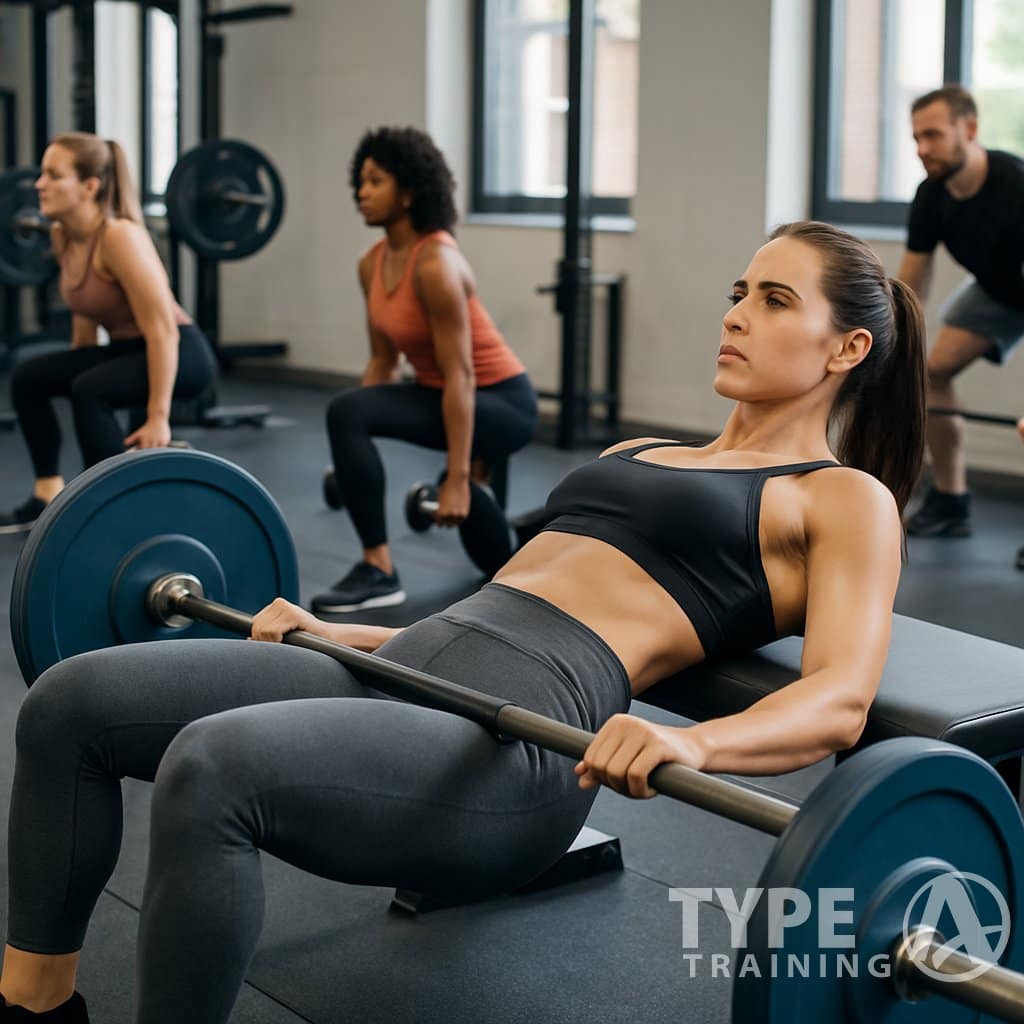
Barbell Hip Thrust
The barbell hip thrust is the classic. It lets you really load up your glutes.
Sit on the floor, upper back on a bench, barbell (with a pad!) across your hips. Feet flat, knees bent at 90 degrees.
Drive through your heels and squeeze your glutes to lift up. Your body should hit that straight line from shoulders to knees.
Hold at the top for a second or two. Focus on squeezing your glutes hard. Lower back down with control and repeat.
Watch out for these common mistakes:
- Pushing with your lower back instead of your glutes
- Not getting your hips all the way up
- Feet too close or too far from your body
Form comes first—don’t rush to add weight. Once you’ve got it down, you can really start loading up. Most folks can go pretty heavy here once their technique is solid. Check out more tips here.
Single-Leg Hip Thrust
The single-leg hip thrust really tests your balance and finds any strength gaps between your sides. This version needs more core work and stability.
Set up just like a regular hip thrust, but stick one leg straight out and keep the other bent.
Push through the heel of your working leg and lift your hips. Keep your spine neutral and don’t let your pelvis twist. The lifted leg should stay straight.
Start with just bodyweight. You probably won’t use as much weight as the two-leg version, and that’s totally normal.
- Fixes muscle imbalances
- Boosts hip stability
- Can help your athletic performance
Shoot for 8-12 reps on each leg before swapping sides.
Banded Hip Thrust
Looping a resistance band above your knees adds extra tension at the top, right where your glutes work the hardest. It’s a sneaky way to get more out of each rep.
Use a medium or heavy band. Get into the usual hip thrust position, upper back on the bench.
Push your knees out against the band while you thrust up. That sideways force lights up your gluteus medius even more.
The band makes it harder as you reach the top. That lines up perfectly with how your glutes work best.
You can mix bands with other resistance, too:
- Band + bodyweight (for beginners)
- Band + dumbbell (a bit tougher)
- Band + barbell (advanced)
Keep the band tight the whole time and focus on pushing your knees out. That’s where the magic happens.
Comparing Hip Thrusts to Other Glute Exercises
Every glute exercise hits your muscles a little differently. Hip thrusts are special because you can really isolate and load up your glutes.
Hip Thrust vs. Glute Bridge
Hip thrusts and glute bridges both use hip extension to work your glutes, but there are some real differences. With hip thrusts, you prop your upper back on a bench. Glute bridges happen flat on the floor.
Hip thrusts give you a bigger range of motion and let you use more weight. That usually means more glute strength and muscle.
Glute bridges are easier to start with and don’t need much gear. They also keep tension at the top, which is great for muscle-building.
Here’s a quick breakdown:
- Setup: Bench vs. floor
- Range of motion: More in hip thrusts
- Weight: You can go heavier in hip thrusts
- Equipment: More for hip thrusts, less for bridges
Both moves do wonders for your glutes. Pick the one that fits your space, equipment, and experience.
Hip Thrust vs. Squat
Hip thrusts and squats both build strong glutes, but they do it in pretty different ways. Squats are a compound movement that hits several muscle groups at once, while hip thrusts zoom in on your gluteus maximus.
Squats put more emphasis on your quads and overall lower body. They also demand more core stability and balance than hip thrusts, which can catch some folks off guard.
Hip thrusts really isolate the hip extension pattern, so they fire up the glutes like nothing else. If you want to grow your glutes, these are hard to beat.
Key things to think about:
- Muscle emphasis: Hip thrusts → glutes; Squats → full lower body
- Functional carryover: Squats usually transfer better to real-life movements
- Loading potential: Both handle heavy weights, just in different ways
- Technical difficulty: Squats often need more coaching and practice
Hip Thrust vs. Deadlift
Deadlifts and hip thrusts both work the posterior chain, but they feel completely different. Deadlifts are a total-body move, hitting everything from your traps to your calves.
Hip thrusts keep tension on the glutes through the whole movement. Deadlifts hit the glutes but also share the load with your hamstrings, back, and grip.
The classic deadlift builds raw strength and power, while Romanian deadlifts dial in more on the hamstring-glute connection.
Some things to consider:
- Technical demands: Deadlifts take more skill to do well
- Spine loading: Hip thrusts are easier on your spine
- Training frequency: You can usually do hip thrusts more often
- Equipment requirements: Both work best with a barbell
Programming Hip Thrusts into Your Workout Routine
Adding hip thrusts to your training takes a little planning. The goal is to grow your glutes without burning out or wrecking your recovery.
Setting Reps, Sets, and Intensity
If you’re just starting, try 3 sets of 10-12 reps with your bodyweight or a light barbell. Nail your form before you chase big numbers.
Once you’ve got the basics, move up to 3-4 sets of 8-10 reps with moderate weight. This hits your glutes hard and builds strength.
If you’re advanced, go heavy for 4-5 sets of 6-8 reps for strength, or stick to 3-4 sets of 12-15 reps if you want more muscle growth.
Weekly Programming Options:
- Full-body routine: 2-3 hip thrust sessions a week
- Split routine: Add them on leg days, 1-2 times a week
- Glute-focused routine: 2-3 sessions with different intensities
Rest 2-3 minutes between heavy sets, or 60-90 seconds for higher reps. Take your time—rushing doesn’t help.
Progressive Overload Principles
Progressive overload is the name of the game for glute strength and size. Muscles get lazy fast, so you need to keep challenging them.
How to push for progress:
- Weight increases: Add 5-10 pounds once you hit all reps with solid form
- Volume increases: Try an extra set or a couple more reps before going heavier
- Tempo manipulation: Slow down the lowering part to 3-4 seconds
- Frequency adjustments: Toss in an extra hip thrust session each week
Track your workouts—just jot down your weight, sets, reps, and how it felt in your phone or notebook. It’s not fancy, but it works.
Try to bump up either weight or reps every week or two, but listen to your body. Chasing numbers while your form falls apart is a bad idea.
Essential Equipment and Variations
The right equipment makes hip thrusts way more comfortable and effective. Picking the right tools lets you really focus on your glutes—and keeps you from dreading the setup.
Choosing the Right Barbell and Weights
The barbell hip thrust is the gold standard for glute gains. If you’ve been lifting a while, use a standard Olympic bar (45 pounds). Beginners might want to start lighter.
Pick a weight that lets you get 10-12 reps with good form. You should feel your glutes working, but you still want to lock out fully at the top.
Use a thick pad or specialized barbell pad to protect your hips. Trust me, bruised hips aren’t a badge of honor.
The Smith machine is a good alternative if you want more stability or feel nervous about free weights. It still targets your glutes well, and it’s less intimidating for a lot of people.
Utilizing Resistance Bands and Dumbbells
Resistance bands add extra tension at the top, right where your glutes are working hardest. Loop a heavy band above your knees or over your hips for a serious burn.
Banded glute bridges are a great warm-up or a solid move for beginners.
Dumbbell hip thrusts work well if you don’t have a barbell. Put a heavy dumbbell across your hips, or use two on either side.
Kettlebells are another option. They’re easy to balance and don’t roll around as much as dumbbells sometimes do.
Hip Thrust Machines and Accessories
Specialized hip thrust machines like the Nautilus Glute Drive or Hoist make setup a breeze. These usually have comfy pads and quick weight changes, so you can just focus on moving weight.
You’ll need a sturdy bench or box. The right height puts your shoulders so your torso is about parallel to the floor at the bottom—too high or too low just feels awkward.
Hip thrust pads or thick foam cushions are a must if you’re going heavy. They spread out the pressure and save your hip bones a lot of grief.
If you want to get fancy, a glute hamstring developer (GHD) bench lets you try single-leg variations and other tweaks to fix strength imbalances.
Common Mistakes and How to Avoid Them
Hip thrusts look simple, but there are plenty of ways to mess them up. Keeping your form tight helps you hit your glutes and keeps injuries at bay.
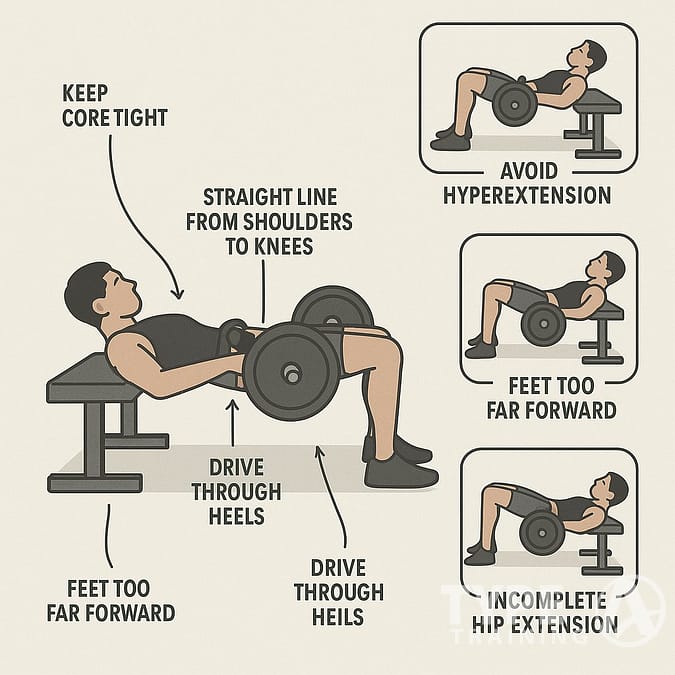
Improper Range of Motion
A lot of people miss full range of motion on hip thrusts. If you don’t go high enough, your glutes don’t fully contract. The goal is a straight line from shoulders to knees at the top.
If you go too high, you start arching your back and stressing your spine. Stop when your torso is parallel to the floor—no need to overdo it.
Think about driving your hips up until your thighs are parallel with the ground, then squeeze your glutes hard at the top before coming down.
Use a mirror or record a quick video to check your form until it feels natural.
Incorrect Foot and Back Position
Your feet and back setup make or break your hip thrusts.
Foot issues:
- Feet too close? Your knees shoot forward and you lose glute tension.
- Feet too far? Glutes check out and your hamstrings take over.
- Uneven feet? One side does more work than the other.
Set your feet shoulder-width apart, flat on the floor, and aim for about 90 degrees at the knees when you start.
Back issues: Bad upper back placement is common. Your shoulder blades should rest on the bench, not your neck or lower back.
Keep your back steady. If you slide up or down the bench, you’ll lose power and risk tweaking something.
Overarching the Lower Back
Lower back pain often means you’re arching too much. If you focus on just lifting your hips, your back can take over and your glutes get lazy.
How to tell if you’re arching too much:
- Your lower back hurts during or after the set
- You feel the move in your back, not your glutes
- Your lower spine curves a lot at the top
Fix it by tucking your tailbone under at the top. Think about a slight posterior pelvic tilt to keep your glutes firing and your spine safe.
Drop the weight until you nail this. Too many people go heavy too soon and end up with sloppy reps. Take your time and build up when your form is solid.
Safety, Modifications, and Rehabilitation Considerations
Good form and smart modifications matter for hip thrusts, especially if you’re working around injuries or mobility limits. There’s no shame in tweaking things to fit your body or current situation.
Modifying Hip Thrusts for Beginners
If you’re just getting started with hip thrusts, don’t rush straight to heavy weights. Begin with bodyweight variations instead. Glute bridges are a great entry point—they hit the same muscles but with a shorter range of motion.
For more stability, you might want to try these beginner tweaks:
- Pick a lower bench or step—something around 12-14 inches works well.
- Loop a mini-band around your knees to cue your form.
- Set your feet a bit wider than hip-width for a sturdier base.
Form Check: Keep your knees tracking over your toes as you move. Don’t let your lower back arch too much, and watch for knees caving inward—it’s more common than you’d think.
Stick with lighter weights at first. Build up your foundation and learn the movement before piling on resistance. That’s how you avoid weird compensation habits and keep injuries at bay.
Glute Training During Injury Recovery
If you’re working through a lower body injury, you can still train your glutes—just tweak your hip thrust variations to fit your needs.
Dealing with cranky knees? Try these:
- Shorten your range of motion.
- Work single-leg variations to lighten the load.
- Swap in banded hip thrusts instead of loading up with weights.
For back pain, nail your pelvic positioning. Stick to a smaller range and really focus on feeling your glutes work, not just moving heavy stuff.
Always check in with your physical therapist before adding hip thrusts to your rehab. They’ll help you figure out what’s safe for your situation.
Improving Hip Mobility
Stiff hips can make hip thrusts awkward and less effective. Regular mobility work is honestly a game changer for both performance and injury prevention.
Before you thrust, try these mobility moves:
- 90/90 hip stretches: Do 2 sets of 30 seconds per side.
- Hip flexor stretches: Hold each side for 45 seconds.
- Foam rolling glutes and hip flexors: Spend 1-2 minutes on each area.
Proper hip extension really needs decent joint mobility. If you feel a pinch in the front of your hips, your hip flexors could be tight.
Go for slow, controlled reps instead of explosive thrusts when working on mobility. That helps your nervous system dial in the right movement patterns and can improve how your hips feel overall.
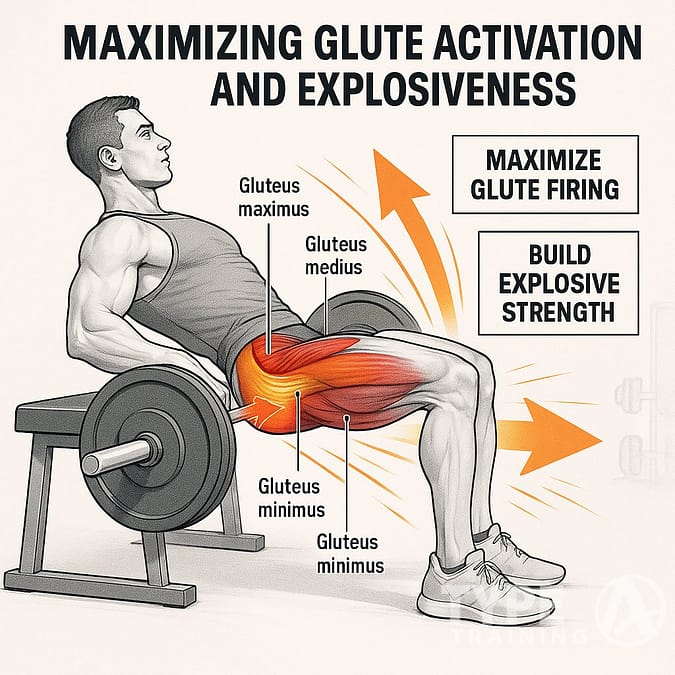
Maximizing Glute Activation and Explosiveness
If you want the most from your hip thrusts, you’ve got to get your glutes firing and train for power. These tips will help you really target your glutes and build explosive strength for sports or just daily life.
Glute Activation Drills
Before you jump into heavy hip thrusts, wake up your glutes with some activation work. That mind-muscle connection is key. Start with unweighted glute bridges, really squeezing at the top.
Some activation drills worth trying:
- Banded lateral walks: Band above the knees, 10-15 steps each way.
- Clamshells: Lie on your side, knees bent, feet together, open knees while feet stay touching.
- Fire hydrants: On all fours, lift one leg out to the side, knee bent.
Pause at the top of each hip thrust for a couple seconds. That really ramps up glute activation. If you’re not feeling it in your glutes, check your foot placement and make sure your knees stay over your toes.
Training for Explosive Power
Your glutes are the engine for speed, jumps, and all things explosive. To build that power, you need to move fast—sometimes.
Power-building techniques to try:
- Speed hip thrusts: Use a moderate load (about 60-70% of your max), focus on blasting up fast.
- Plyometric hip thrusts: Push up hard enough that your hips leave the ground for a split second.
- Single-leg power thrusts: One leg at a time to challenge stability and fix imbalances.
Change up your tempo—go slow on the way down (3-4 seconds), then explode up. This kind of contrast builds both strength and power.
Try adding bands to your barbell. That way, the tension increases at the top, where your glutes have to work hardest. This is great for building end-range power, which shows up in real-world sports.
Building Glute Size and Strength for Athletic Performance
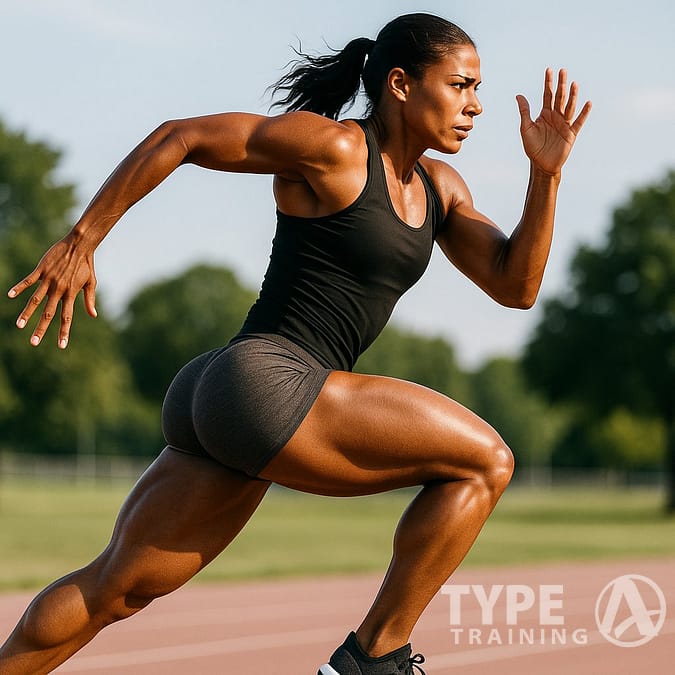
Strong glutes aren’t just for looks—they’re the powerhouse for running, jumping, and just about every explosive sport you can think of.
Increasing Glute Size and Muscle Mass
Hip thrusts are honestly the go-to move for glute growth. When you do them right, they hit your gluteus maximus—the main muscle—better than most other lifts.
For best results, focus on:
- Progressive overload: Add weight as you get stronger, but don’t rush it.
- Proper form: Chin tucked, core braced.
- Full range of motion: Lock out your hips at the top.
- Mind-muscle connection: Actively squeeze your glutes the whole time.
Try for 3-4 sets of 8-12 reps with a weight that’s challenging but doable. Consistent hip thrust training can noticeably boost glute size and shape up your lower body.
Strength Transfer to Sports Movements
Your glutes are the driving force for sprints, jumps, squats, and deadlifts. Stronger glutes mean you’ll do all of those better.
Hip thrusts help you:
- Produce more power: More force for running and jumping.
- Sprint faster: Push off harder with each stride.
- Change direction efficiently: Better lateral movement.
- Prevent injuries: Take stress off your back and knees.
The horizontal force you train in hip thrusts carries over to athletic moves that need hip extension. If your sport needs speed or power, you’ll want these in your routine.
And hey, stronger glutes also mean better posture and less chance of lower back pain. That’s a win whether you’re an athlete or just trying to feel good day to day. Better performance in and out of the gym starts here.
Frequently Asked Questions
People have a lot of questions about hip thrusts—technique, benefits, you name it. Here’s a quick FAQ to clear up the big ones.
What are the benefits of hip thrust exercises for glute development?
Hip thrusts are widely seen as the top choice for glute strength and size. They hit the glutes directly through a full range of motion.
Unlike some other lifts, hip thrusts keep tension on your glutes at the top—right where they’re strongest. That’s huge for muscle growth.
But it’s not just about looks. Strong glutes help with sprinting, jumping, posture, and can even reduce injury risk by strengthening your backside.
Can hip thrusts be as effective as squats for targeting glutes?
Honestly, hip thrusts often beat squats for glute isolation. Squats work a bunch of muscles, but hip thrusts really zero in on your glutes.
Research shows hip thrusts activate the glutes more than squats, thanks to the way the force is applied. If your main goal is glute growth, you’ll want to prioritize them.
Still, for all-around leg strength, use both. Squats build everything; hip thrusts maximize glute gains.
What is the correct form to perform a hip thrust exercise?
Sit on the floor with your upper back against a bench. Rest a barbell across your hips. Bend your knees, feet flat and hip-width apart.
Drive through your heels to lift your hips until you’re in a straight line from shoulders to knees. Squeeze your glutes at the top.
Keep your chin tucked and don’t let your back arch. Lower your hips smoothly, keeping tension on your glutes.
Use a barbell pad—your hips will thank you.
How can hip thrusts be performed safely and effectively at home?
You can totally do hip thrusts at home—no fancy gear needed. A couch or sturdy coffee table works for back support.
For resistance, loop a band around your hips and anchor it under your feet. Or just use a dumbbell, weight plate, or even something heavy from around the house.
Bodyweight hip thrusts still work, especially if you go single-leg for extra challenge. Focus on your form and really squeeze at the top.
Make sure your support won’t slide. Nothing ruins a workout like a wobbly bench or table.
Which muscles are primarily engaged during a hip thrust workout?
Hip thrusts mainly work your gluteus maximus, medius, and minimus—the whole glute squad. These muscles drive the hip extension.
You’ll also hit your hamstrings, quads, and hip flexors as backup players. Your core and lower back keep you steady the whole time.
Because hip thrusts focus on the glutes, they’re great for fixing muscle imbalances from too much sitting and for boosting athletic moves like running and jumping.
How often should one incorporate hip thrusts to see improvements in glute strength?
If you want to see real glute gains, try doing hip thrusts 2-3 times per week. Give yourself at least 24-48 hours between sessions so your muscles can actually recover.
Start out with 3-4 sets of 8-12 reps, and really pay attention to your form—full glute engagement is key. Once you get the hang of it, go for heavier weights instead of just cranking out more reps.
Mix things up with different hip thrust variations, like single-leg thrusts, banded thrusts, or even elevated ones. It keeps things interesting and, honestly, helps you avoid hitting a plateau.